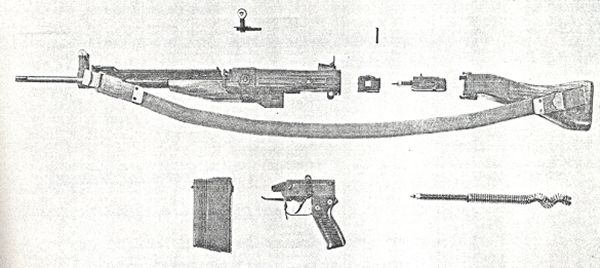
1. Weapon theory

1.1. Designation and purpose

The semi-automatic sporting rifle SIG-AMT is a delayed blow-back weapon with stationary barrel and semi-rigid breech. 

The cartridges are fed from magazines of 5, 10, or 20 rounds. 

A considerably reduced recoil, and the bipod which lends the rifle a firm support, improves accuracy of aim in all types of fire. 

Next to the normal trigger, in latched neutral position, is a winter trigger, This can be unlatched and shifted into engagement to allow firing during very cold weather while wearing mittens.

In the head of the breech casing is a loading_indicator, affording a visual check as to whether the weapon is loaded or unloaded. 

1.2. Main components

The principal parts of the weapon are: 

- Barrel, bolted firmly to the breech casing.

- Breech casing with two lock heads, carrying handle, loading indicator, bolt, rear sight and cartridge ejector opening. 

- Breech with breech head and director shaft, connected by a transverse key. 

- Rear casing with butt and recoil spring column. 

- Trigger unit with trigger casing, trigger mechanism, safety catch, winter trigger, pistol grip with cavity for storing cleaning materials and magazine charger. 

- Barrel casing   with bipod, hand rest, and front sight mount. 
 

1.3. Dismantling and assembling 

Routine dismantling 

- (1) Unload weapon as per Section 2.1. - (2)   Remove butt 

- (3)   Draw and remove bolt - (4)   Extract breech 

- (5)   Remove trigger  casing ( squeeze retaining 
pin with thumb  and forefinger, and slide to the right). 

- (6)   Separate the breech head from the director shaft by removing the transverse key. 

- (7)   Remove the recoil spring column from the butt. 
 

Detailed dismantling 

- (1) Routine dismantling (1-7) 

- (8)   Detach the sling by unhooking the spring hook from the front sling bracket. 

- (9)   Remove upper part of handrest 

-(10)   Unscrew the hand rest screw, and remove the hand rest 

-(II)   Unscrew and remove the screw from the connector piece of the barrel casing 

-(12)   Slide the barrel casing forward off the barrel 

-(13)   Dismantle the magazine 

-(14)   Unscrew the butt screw 

-(15)   Remove the butt, together with the end 
plate and the rear sling bracket, from the rear casing. 

Assembly

Reverse the above operation sequence
 

1.4. Cleaning and maintenance 

Rough cleaning 

- Clean down the rifle and magazines externally and then grease them. 

Routine cleaning 

- Routine dismantling as in Section 1.3. -Clean down all dismantled components, 
including magazines and grease them. 

-Clean the bore. Caution: Lift the loading indicator and secure it in raised position with the holder. Check and grease. 

-Clean and grease the breech and breech casing. 

-Clean and grease the recoil spring -Check over all principal parts. -Assemble the weapon. 

-Perform the functional checks as per 
Section 1.5. 

Complete cleaning

- Detailed dismantling as per section 1.3. 

-Clean, check and grease all components in the same manner as for routine cleaning 

-Assemble the weapon, 

-Perform the functional checks as per Section 1.5. 


1.5. Functional checks

a) Safety catch

- Set safety catch to 'S" 

- Pull bolt backwards and .release

- Check that the trigger remains locked 

b)  Firing action

- Set safety catch to 

- Squeeze trigger with left hand. 

- Draw back the bolt with the right hand, and allow the breech to glide forward slowly. 

-Check that when the breech is locked, the hammer is not released. 

- Release the trigger 

- Set safety catch to visit. 

c) Pressure point

- Set safety catch to 

- Squeeze winter trigger 

- Check several times whether the pressure point can be felt. 

d) "Locked breech gap" (Similar to head space) 

-Turn the weapon, without magazine, to direct the magazine opening upwards 

- Perform vigorous loading action repeatedly by hand. 

- Check the gap on the left hand side between the breech head and the director shaft at locked breech position, using the gauge provided. 


Back to Contents